默认编辑器
此扩展点用于扩展默认编辑器的功能。
定义方式
export default definePlugin({
  extensionPoints: {
    "default:editor:extension:create": ():
      AnyExtension[] | Promise<AnyExtension[]> => {
      return [FooExtension];
    },
  },
});
Halo 独有扩展
阅读本文前请确保已经熟悉 Tiptap 的扩展文档。这里将介绍如何扩展编辑器的工具栏、悬浮菜单、Slash Command、拖拽菜单等功能。
目前支持的所有扩展类型如下所示:
export interface ExtensionOptions {
  // 顶部工具栏扩展
  getToolbarItems?: ({
    editor,
  }: {
    editor: Editor;
  }) => ToolbarItemType | ToolbarItemType[];

  // Slash Command 扩展
  getCommandMenuItems?: () => CommandMenuItemType | CommandMenuItemType[];

  // 悬浮菜单扩展
  getBubbleMenu?: ({ editor }: { editor: Editor }) => NodeBubbleMenuType;

  // 工具箱扩展
  getToolboxItems?: ({
    editor,
  }: {
    editor: Editor;
  }) => ToolboxItemType | ToolboxItemType[];

  // 拖拽菜单扩展
  getDraggableMenuItems?: ({
    editor,
  }: {
    editor: Editor;
  }) => DragButtonType | DragButtonType[];
}
完整定义参考当前版本的 ExtensionOptions。
1. 顶部工具栏扩展
编辑器顶部功能区域内容的扩展,通常用于增加用户常用操作,例如文本加粗、变更颜色等。
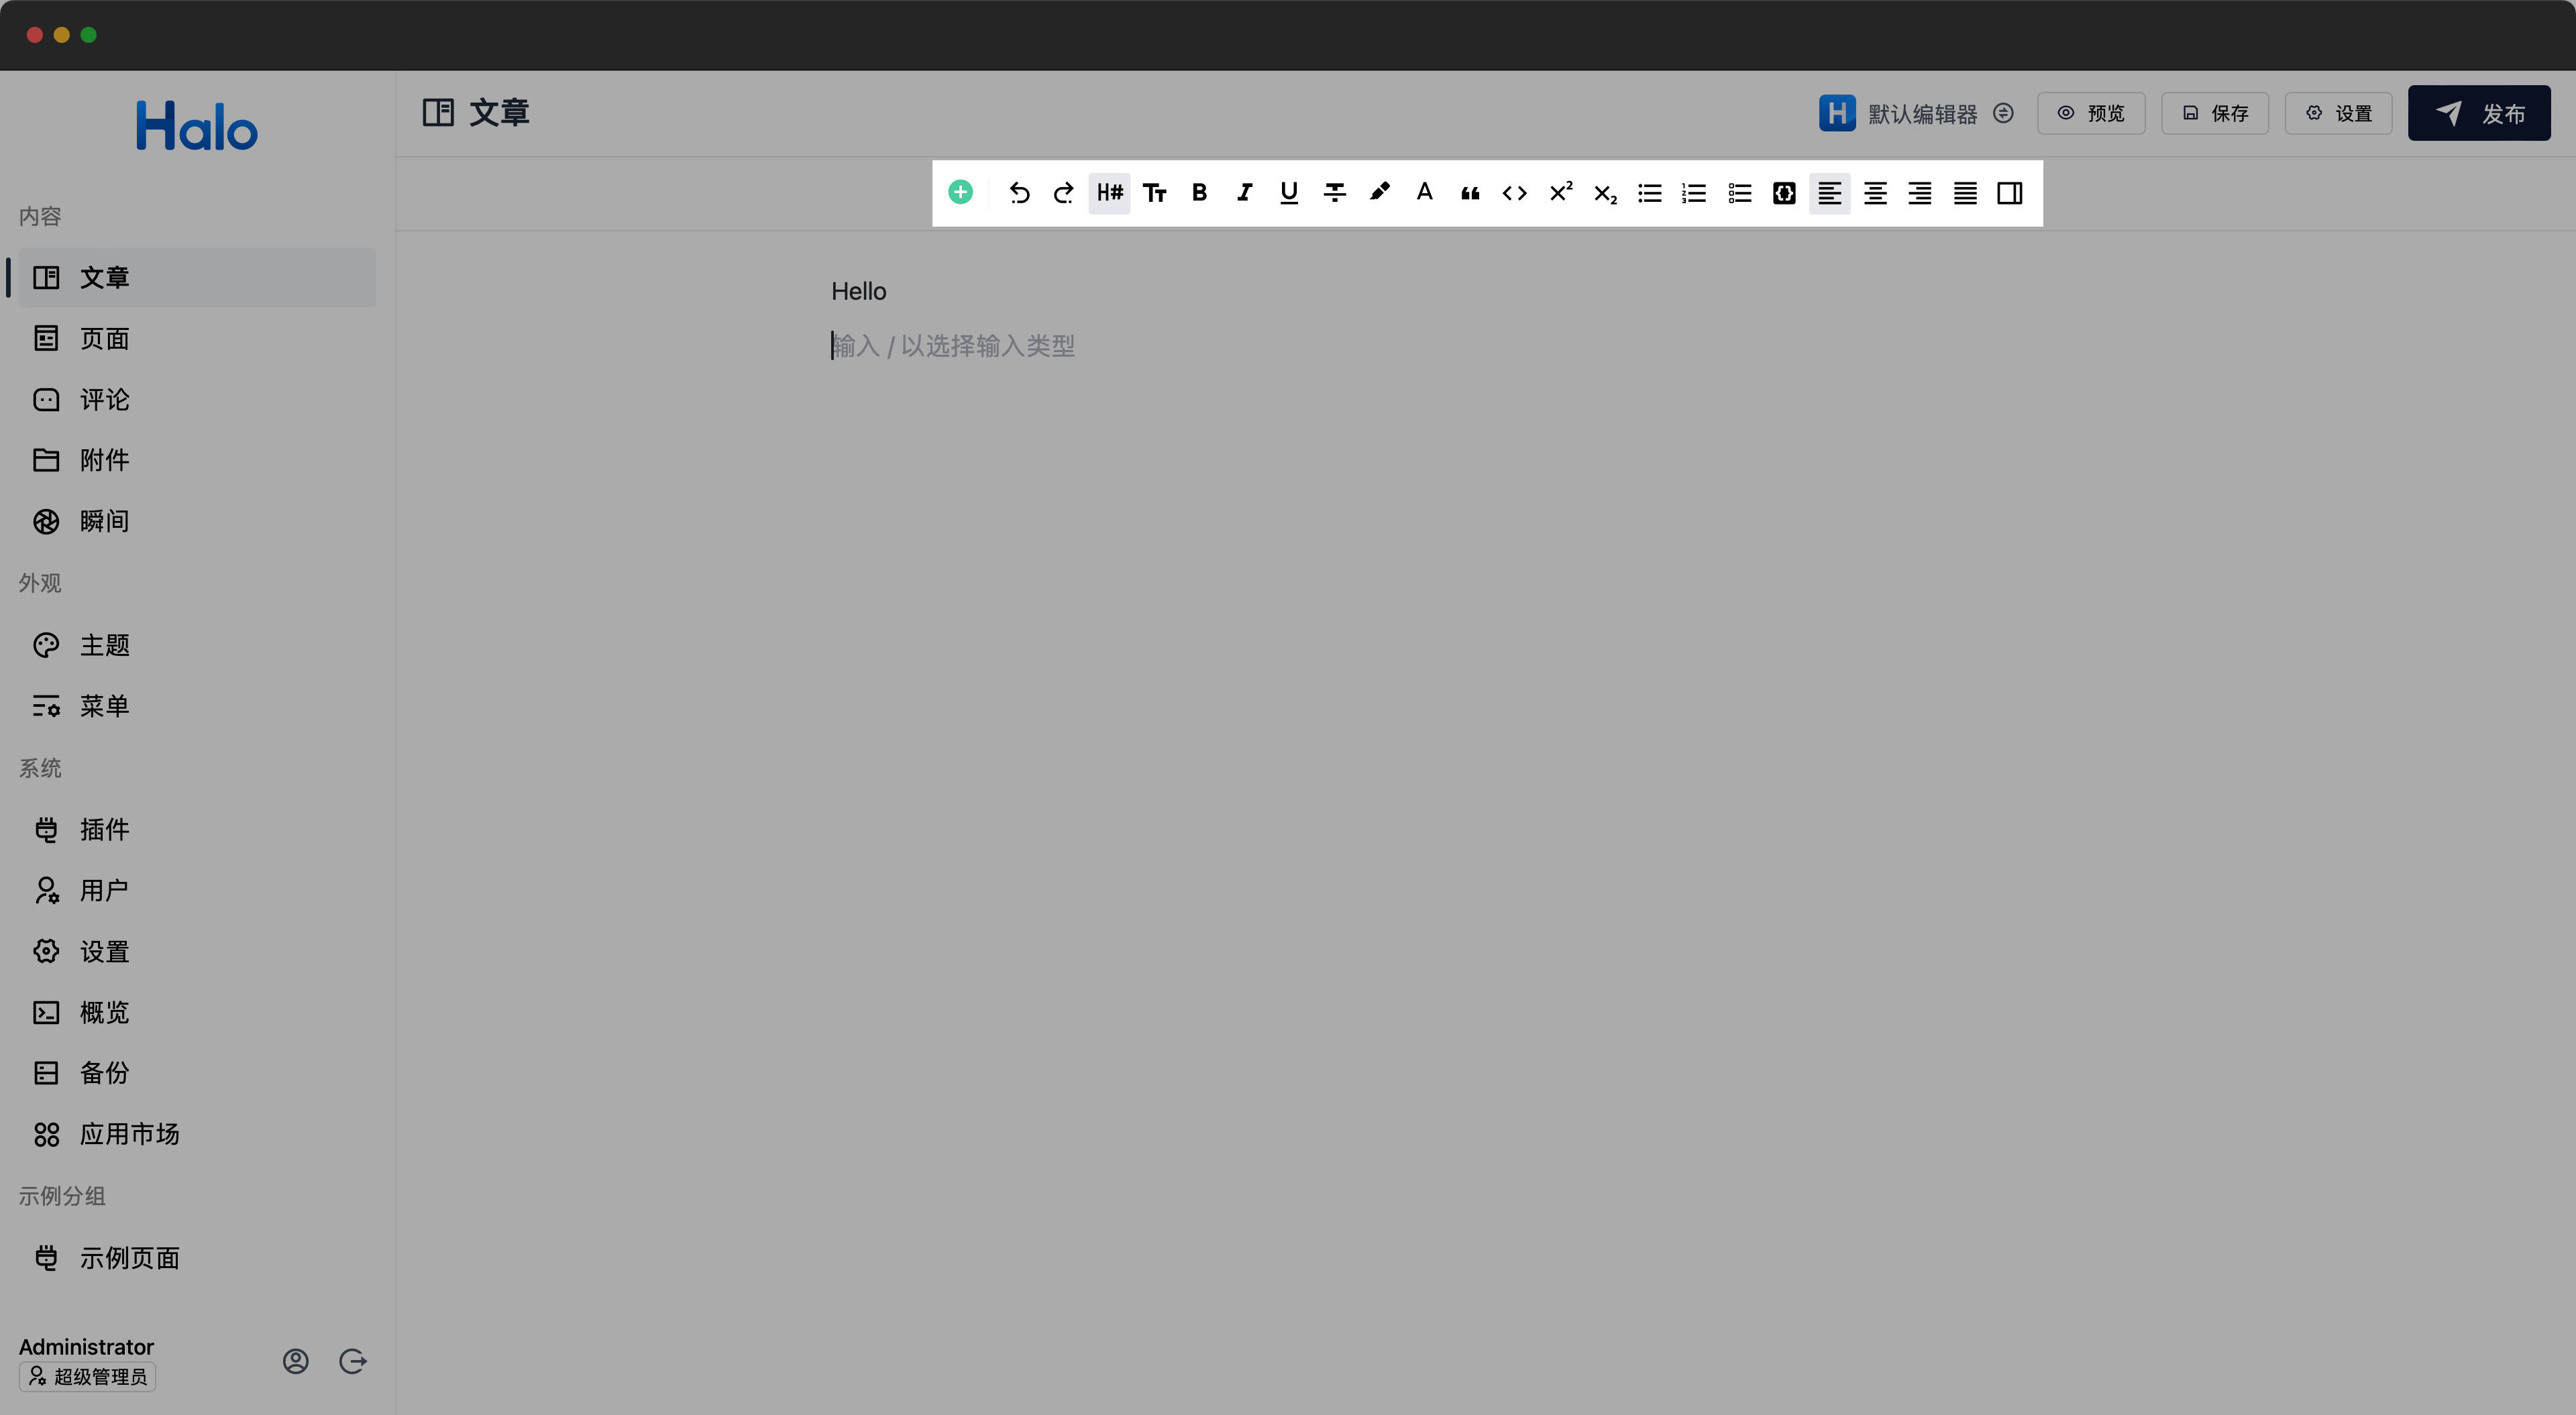
在 https://github.com/halo-sigs/richtext-editor/pull/16 中,我们实现了对顶部工具栏的扩展,如果需要添加额外的功能,只需要在具体的 Tiptap Extension 中的 addOptions 中定义 getToolbarItems 函数即可,如:
{
  addOptions() {
    return {
      ...this.parent?.(),
      getToolbarItems({ editor }: { editor: Editor }) {
        return []
      },
    };
  },
}
其中 getToolbarItems 即为对顶部工具栏的扩展。其返回类型为:
// 顶部工具栏扩展
getToolbarItems?: ({
  editor,
}: {
  editor: Editor;
}) => ToolbarItemType | ToolbarItemType[];

// 工具栏
export interface ToolbarItemType {
  priority: number;
  component: Component;
  props: Omit<ToolbarItemComponentProps, "children"> & Record<string, unknown>;
  children?: ToolbarItemType[];
}

export interface ToolbarItemComponentProps {
  editor: Editor;
  isActive: boolean;
  disabled?: boolean;
  icon?: Component;
  title?: string;
  shortcutId?: string;
  shortcutIds?: string[];
  action?: () => void;
  children?: ToolbarItemType[];
}
如下为 Bold 扩展中对于 getToolbarItems 的扩展示例:
addOptions() {
  return {
    ...this.parent?.(),
    getToolbarItems({ editor }: { editor: Editor }) {
      return {
        priority: 40,
        component: markRaw(ToolbarItem),
        props: {
          editor,
          isActive: editor.isActive(TiptapBold.name),
          icon: markRaw(MingcuteBoldLine),
          title: i18n.global.t("editor.common.bold"),
          shortcutId: "editor.format.bold",
          action: () => {
            editor.chain().focus().toggleBold().run();
          },
        },
      };
    },
  };
},
2. 工具箱扩展
编辑器工具箱区域的扩展,可用于增加编辑器附属操作,例如插入表格,插入第三方组件等功能。
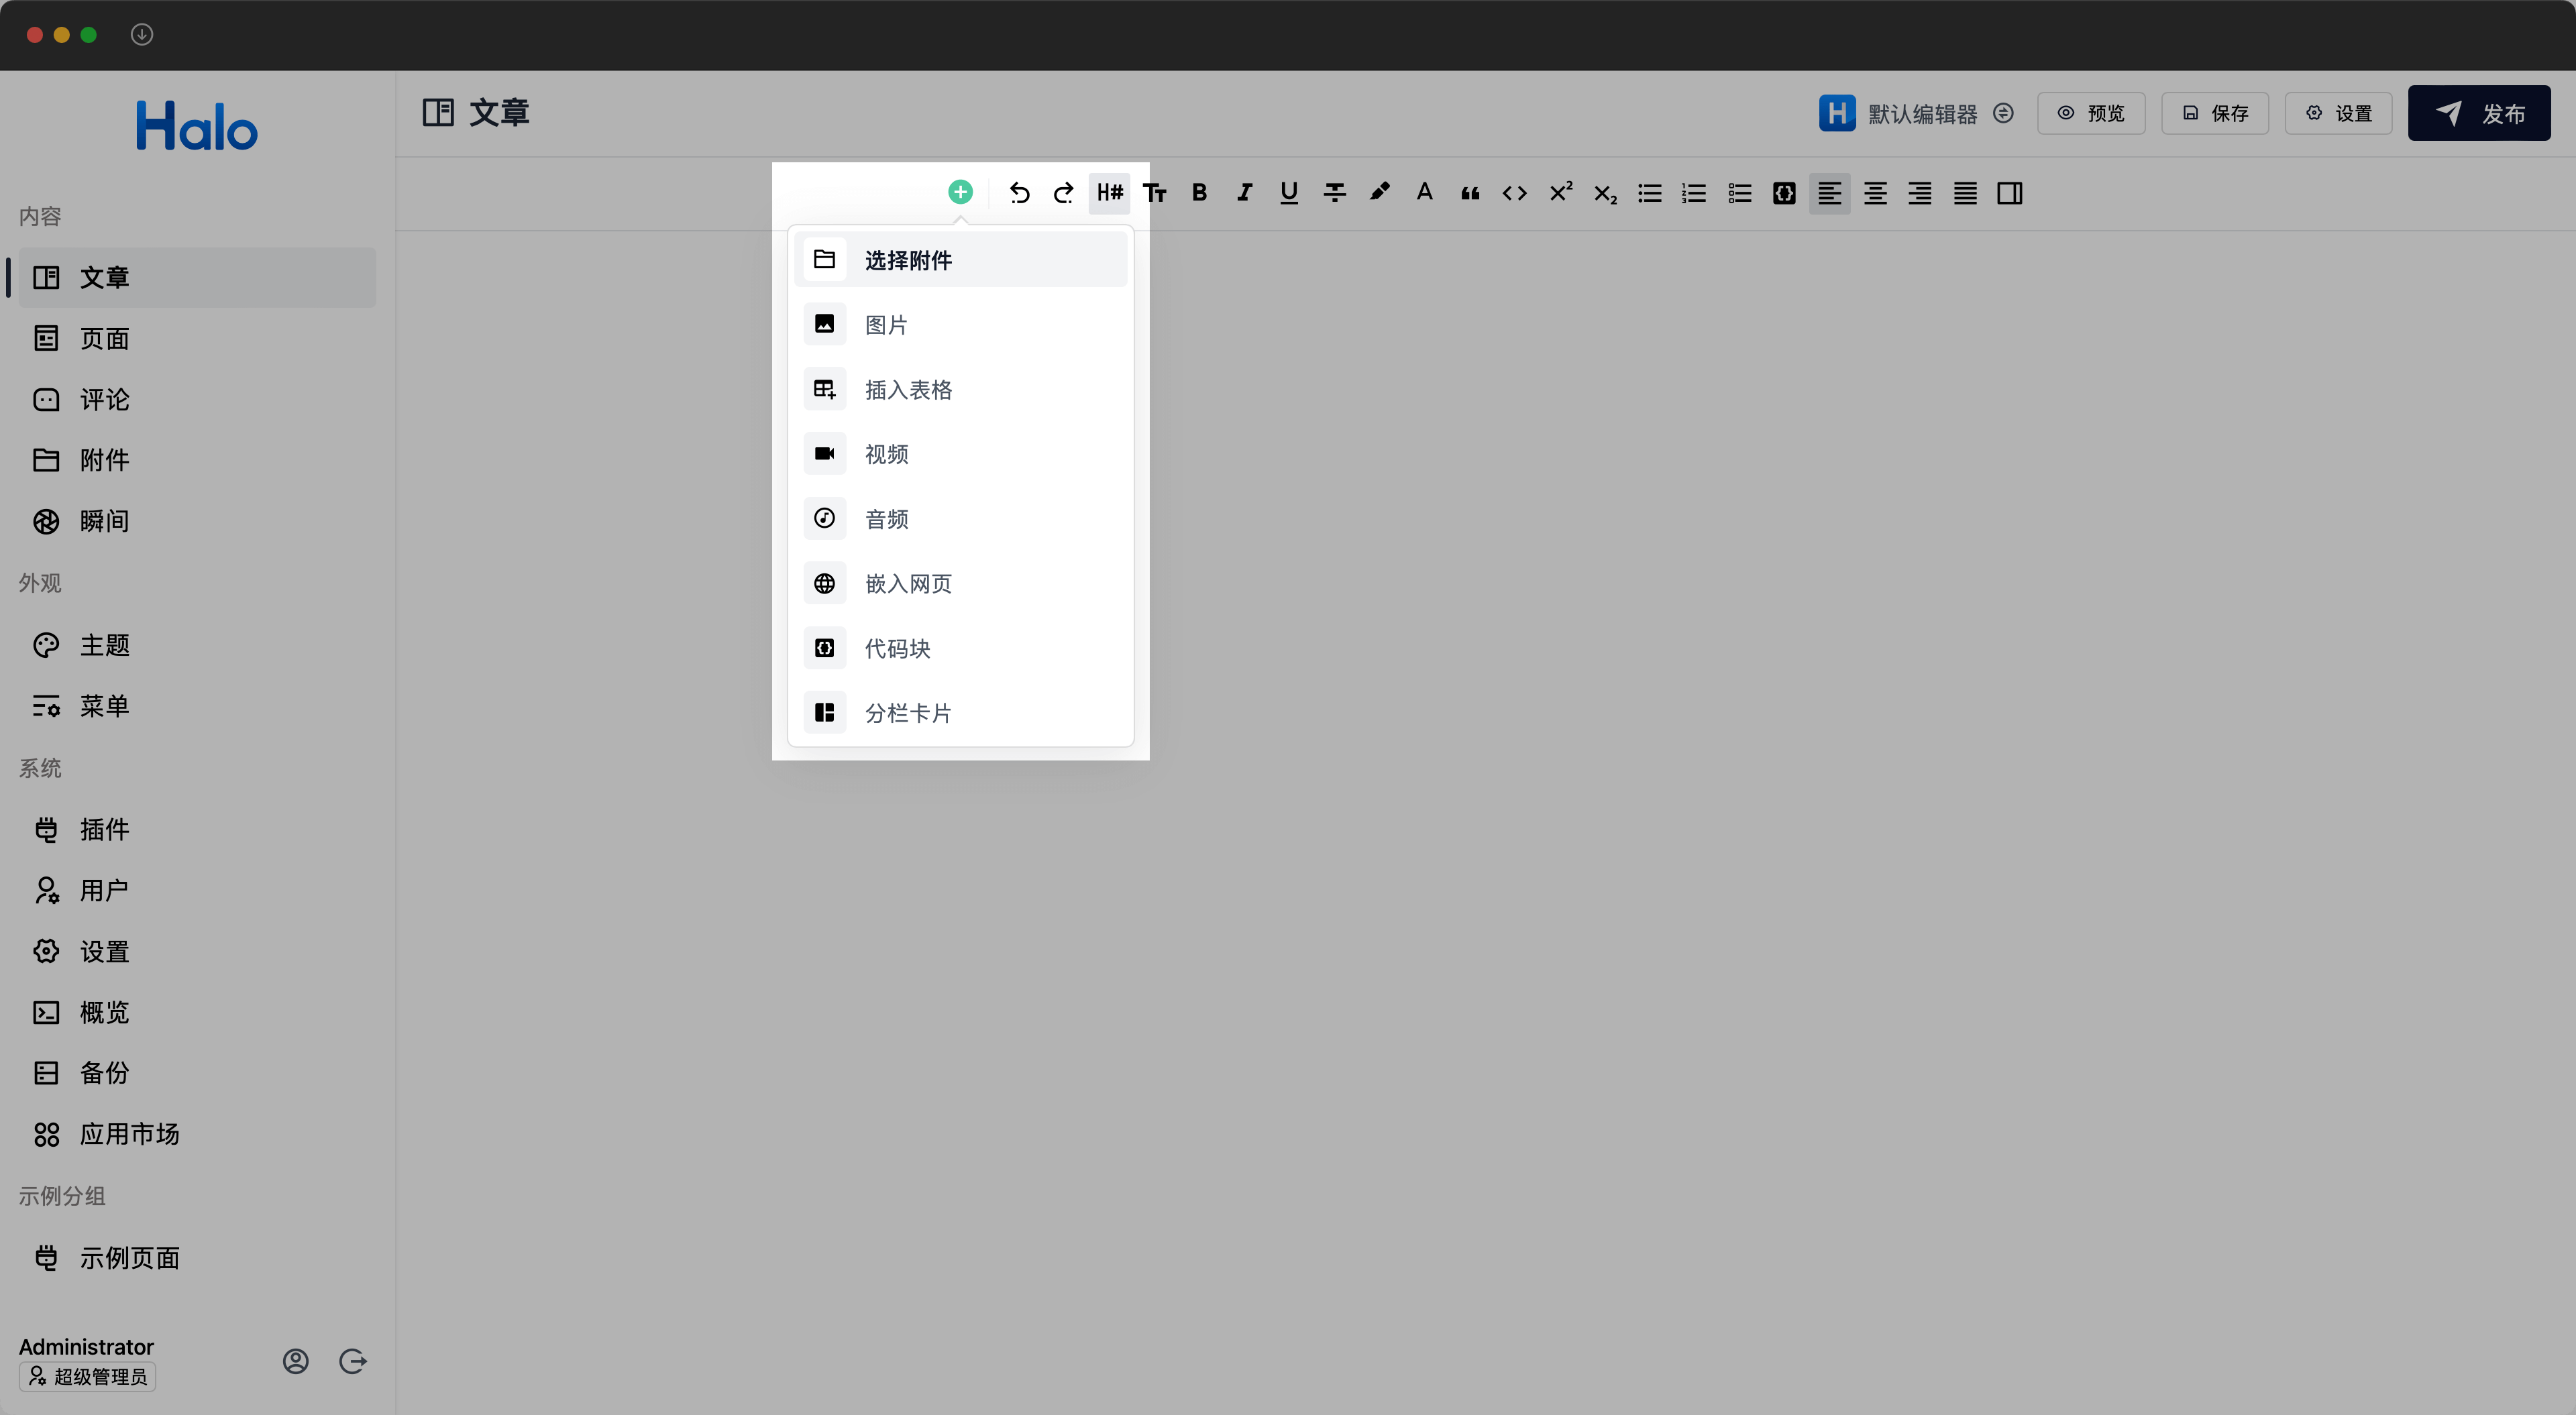
在 https://github.com/halo-sigs/richtext-editor/pull/27 中,我们实现了对编辑器工具箱区域的扩展,如果需要添加额外的功能,只需要在具体的 Tiptap Extension 中的 addOptions 中定义 getToolboxItems 函数即可,如:
{
  addOptions() {
    return {
      ...this.parent?.(),
      getToolboxItems({ editor }: { editor: Editor }) {
        return []
      },
    };
  },
}
其中 getToolboxItems 即为对工具箱的扩展。其返回类型为:
// 工具箱扩展
getToolboxItems?: ({
  editor,
}: {
  editor: Editor;
}) => ToolboxItemType | ToolboxItemType[];

export interface ToolboxItemType {
  priority: number;
  component: Component;
  props: ToolboxItemComponentProps & Record<string, unknown>;
}

export interface ToolboxItemComponentProps {
  editor: Editor;
  icon?: Component;
  title?: string;
  description?: string;
  action?: () => void;
}
如下为 Table 扩展中对于 getToolboxItems 工具箱的扩展示例:
addOptions() {
  return {
    ...this.parent?.(),
    getToolboxItems({ editor }: { editor: Editor }) {
      return {
        priority: 40,
        component: markRaw(TableInsertToolboxItem),
        props: {
          editor,
          icon: markRaw(MdiTablePlus),
          title: i18n.global.t("editor.menus.table.add"),
          description: i18n.global.t("editor.menus.table.insert_description"),
        },
      };
    },
  }
}
3. Slash Command 扩展
Slash Command(斜杠命令)的扩展,可用于在当前行快捷执行功能操作,例如转换当前行为标题、在当前行添加代码块等功能。
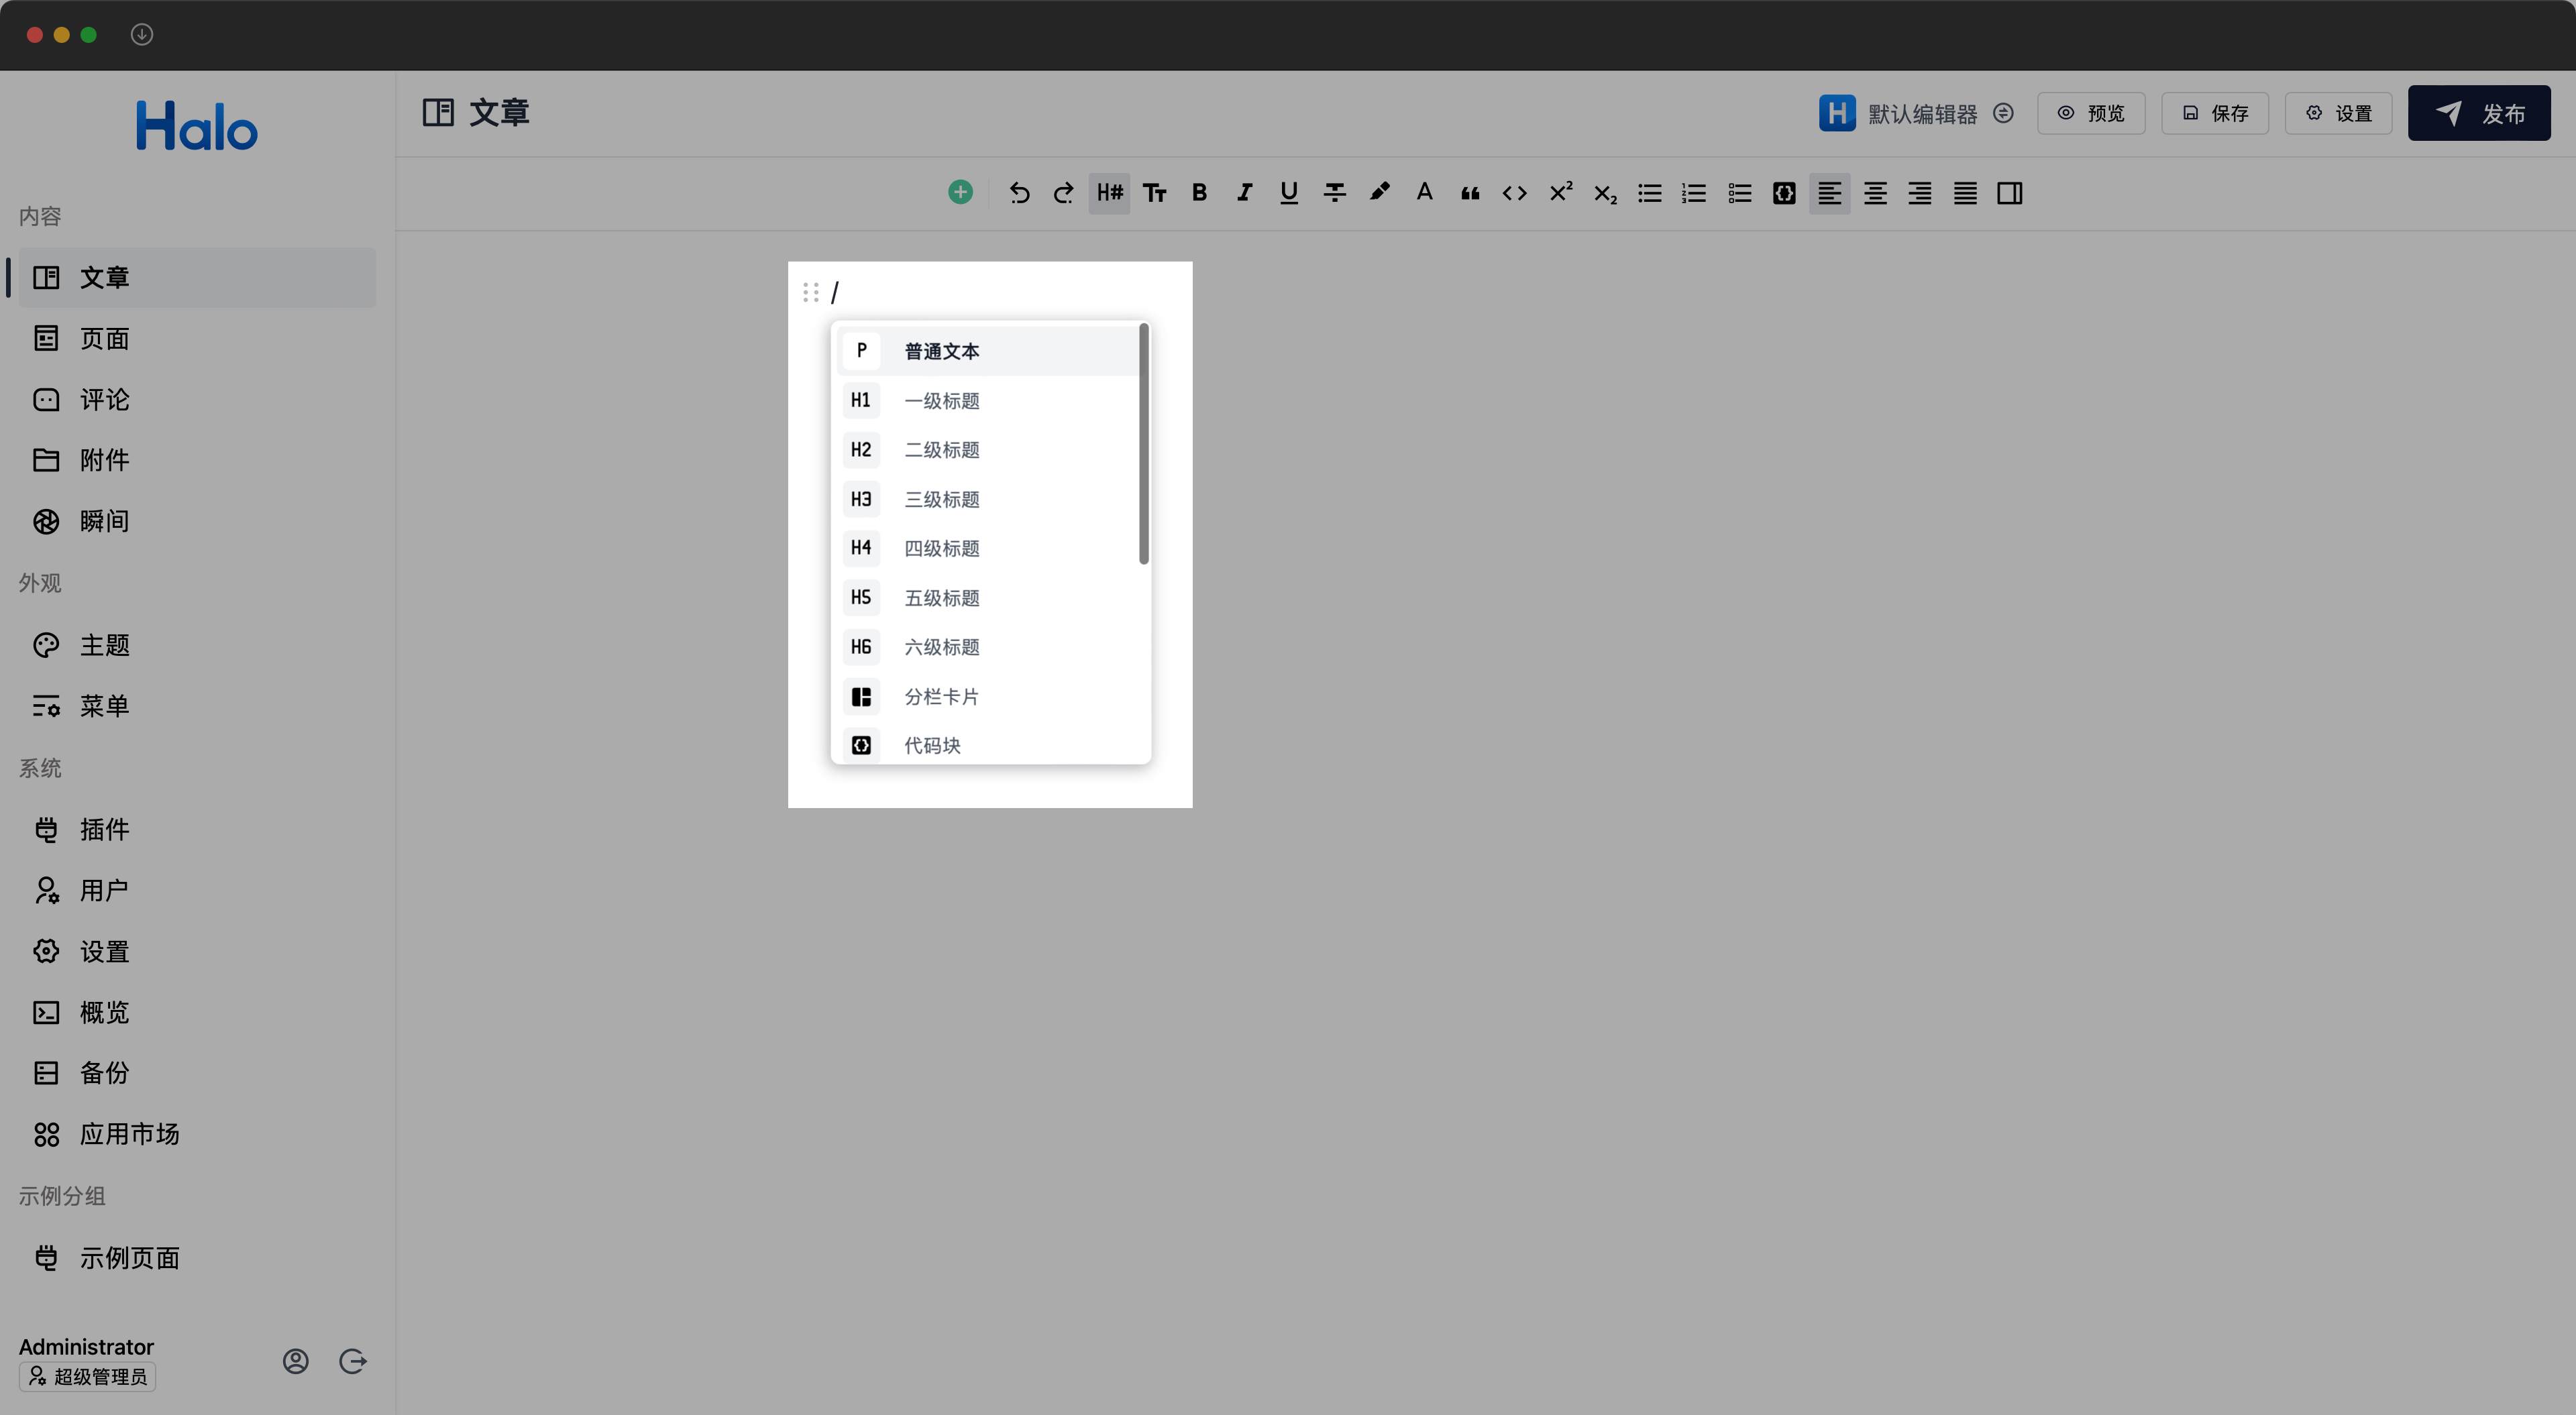
在 https://github.com/halo-sigs/richtext-editor/pull/16 中,我们实现了对 Slash Command 指令的扩展,如果需要添加额外的功能,只需要在具体的 Tiptap Extension 中的 addOptions 中定义 getCommandMenuItems 函数即可,如:
{
  addOptions() {
    return {
      ...this.parent?.(),
      getCommandMenuItems() {
        return []
      },
    };
  },
}
其中 getCommandMenuItems 即为对工具箱的扩展。其返回类型为:
// Slash Command 扩展
getCommandMenuItems?: () => CommandMenuItemType | CommandMenuItemType[];

export interface CommandMenuItemType {
  priority: number;
  icon: Component;
  title: string;
  keywords: string[];
  shortcutId?: string;
  command: ({ editor, range }: { editor: Editor; range: Range }) => void;
}
如下为 Table 扩展中对于 getCommandMenuItems 的扩展示例:
addOptions() {
  return {
    ...this.parent?.(),
    getCommandMenuItems() {
      return {
        priority: 120,
        icon: markRaw(MdiTable),
        title: "editor.extensions.commands_menu.table",
        keywords: ["table", "biaoge"],
        command: ({ editor, range }: { editor: Editor; range: Range }) => {
          editor
            .chain()
            .focus()
            .deleteRange(range)
            .insertTable({ rows: 3, cols: 3, withHeaderRow: true })
            .fitTableToWidth()
            .run();
        },
      };
    },
  }
}
4. 悬浮菜单扩展
编辑器悬浮菜单的扩展。可用于支持目标元素组件的功能扩展及操作简化。例如 Table 扩展中的添加下一列、添加上一列等操作。
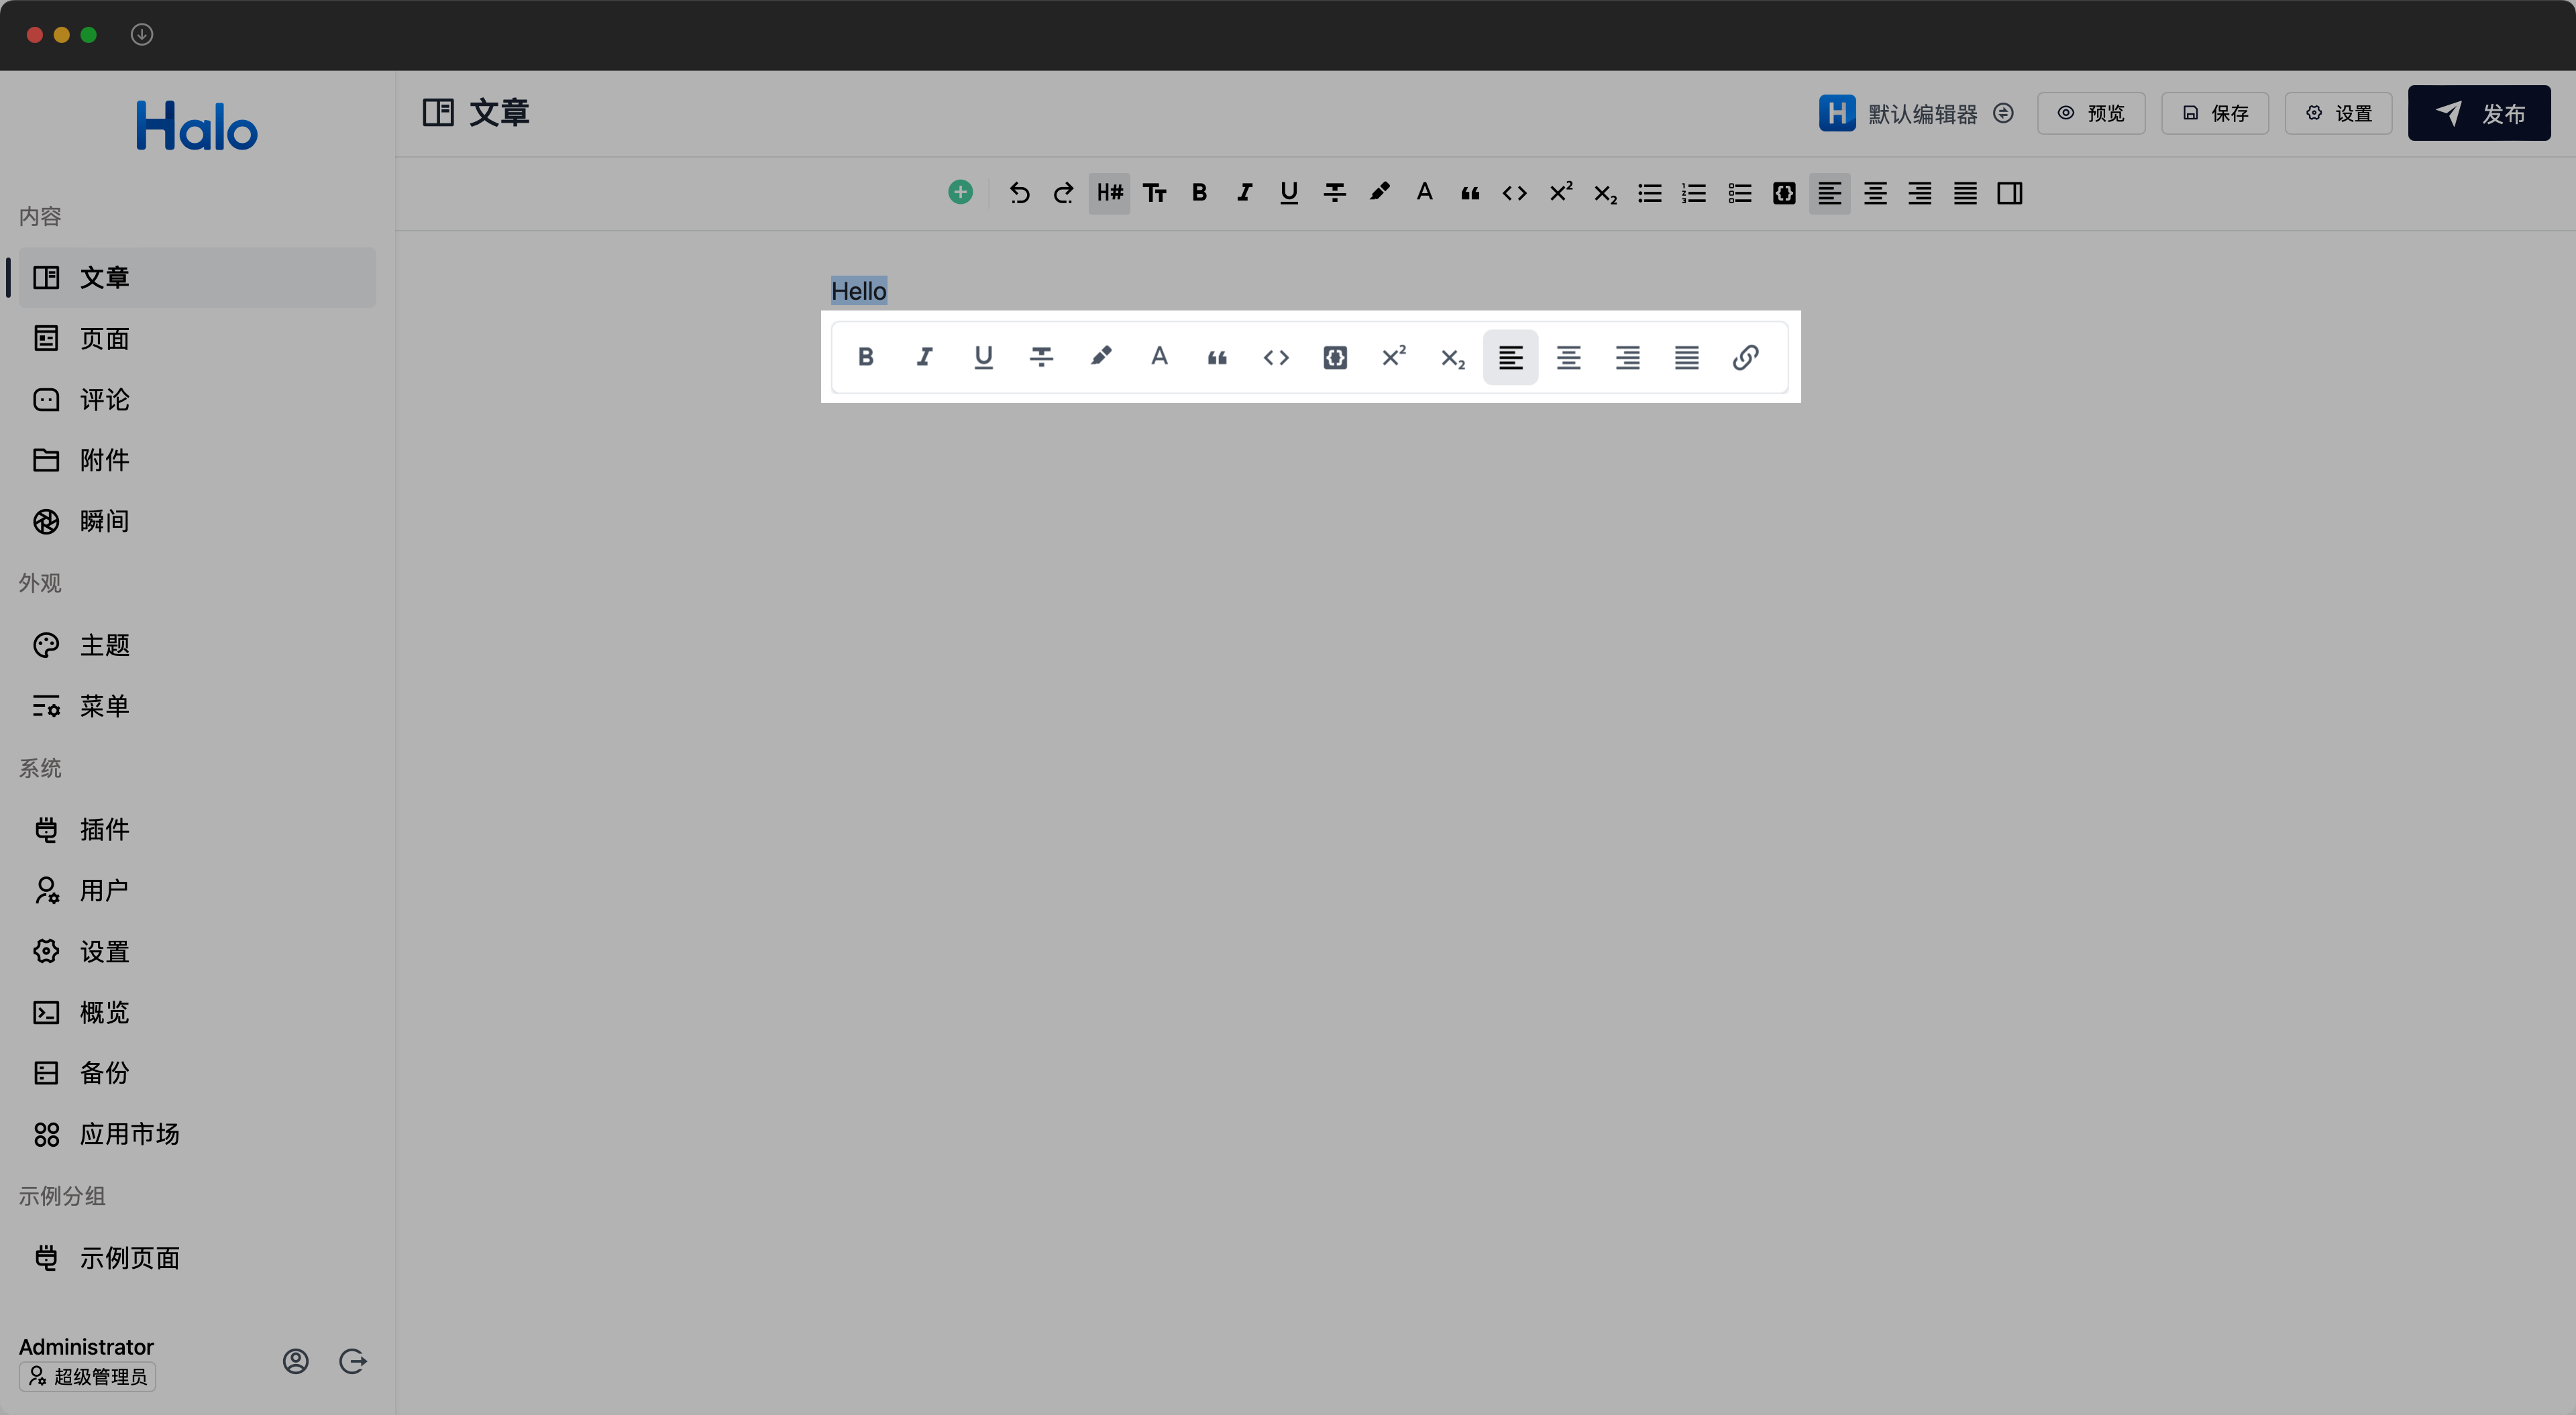
在 https://github.com/halo-sigs/richtext-editor/pull/38 中,我们重构了对编辑器悬浮区域的扩展,如果需要对某个块进行支持,只需要在具体的 Tiptap Extension 中的 addOptions 中定义 getBubbleMenu 函数即可,如:
{
  addOptions() {
    return {
      ...this.parent?.(),
      getBubbleMenu({ editor }: { editor: Editor }) {
        return {}
      },
    };
  },
}
其中 getBubbleMenu 即为对悬浮菜单的扩展。其返回类型为:
getBubbleMenu?: ({ editor }: { editor: Editor }) => NodeBubbleMenuType;
NodeBubbleMenuType 使用 Floating UI 定位,通过 options 配置位置,通过 getReferencedVirtualElement 指定锚点;旧版的 tippyOptions 和 getRenderContainer 已不再支持。完整字段参考 BubbleMenuProps。
如下为 Table 扩展中对于 getBubbleMenu 的实现:
addOptions() {
  return {
    ...this.parent?.(),
    getBubbleMenu({ editor }) {
      return {
        pluginKey: TABLE_BUBBLE_MENU_KEY,
        component: markRaw(TableBubbleMenu),
        shouldShow: ({ state }: { state: EditorState }): boolean => {
          return isActive(state, "table");
        },
        options: {
          placement: "top-start",
          offset: 8,
          flip: {
            padding: 8,
            fallbackPlacements: ["bottom-start"],
          },
          shift: {
            padding: 8,
            crossAxis: true,
          },
        },
        getReferencedVirtualElement() {
          return getTableBubbleMenuVirtualElement(editor);
        },
      }
    }
  }
}
5. 拖拽菜单扩展
拖拽菜单扩展主要用于拖拽的菜单功能扩展,例如转换为、复制、剪切、删除等操作。
在 https://github.com/halo-dev/halo/pull/7861 中,我们重构了对编辑器拖拽区域的扩展,并且支持了对拖拽菜单的扩展。如果需要对拖拽菜单进行扩展,只需要在具体的 Tiptap Extension 中的 addOptions 中定义 getDraggableMenuItems 函数即可,如:
{
  addOptions() {
    return {
      ...this.parent?.(),
      getDraggableMenuItems({ editor }: { editor: Editor }) {
        return []
      },
    };
  },
}
同时,为了支持不同扩展对同一菜单项的扩展,我们提供了 extendsKey 属性,用于指定扩展目标菜单项的唯一标识。只需将 extendsKey 设置为已有的菜单项的 key,即可扩展该菜单项。可扩展已有菜单项的 visible、isActive、disabled、action 方法以及 children.items 属性,如:
{
  addOptions() {
    return {
      ...this.parent?.(),
      getDraggableMenuItems({ editor }: { editor: Editor }) {
        return {
          extendsKey: CONVERT_TO_KEY,
          // 当任意扩展目标菜单项的 visible 方法返回 false 时,当前菜单项不会显示。返回 true 则会继续执行后续的扩展实现。
          visible: ({ editor }) => {
            if (isActive(editor.state, "table")) {
              return false;
            }
            return true;
          },
        };
      },
    };
  },
};
拖拽菜单最多支持两级菜单嵌套,如果想扩展已有的一级菜单,为其二级菜单增加内容,则需要同时设置 extendsKey 和 children.items 属性。如:
{
  addOptions() {
    return {
      ...this.parent?.(),
      getDraggableMenuItems({ editor }: { editor: Editor }) {
        return {
          extendsKey: CONVERT_TO_KEY,
          children: {
            items: [
              {
                priority: 10,
                icon: markRaw(MdiFormatParagraph),
                title: i18n.global.t("editor.common.heading.paragraph"),
                action: ({ editor }: { editor: Editor }) =>
                  editor.chain().focus().setParagraph().run(),
              },
            ],
          },
        }
      },
    };
  },
}
默认情况下,将会追加 items,若想覆盖,则需要设置子菜单的 key 属性,将会覆盖原有的子菜单项。
getDraggableMenuItems 的返回类型如下:
getDraggableMenuItems?: ({
  editor,
}: {
  editor: Editor;
}) => DragButtonType | DragButtonType[];
菜单项可以通过 key 合并同级项,通过 extendsKey 扩展已有项;title 函数会收到当前的 editor、node 和 pos。完整字段参考 DragButtonItemProps。
6. 快捷键扩展
从 Halo 2.26.0 开始,默认编辑器在 Tiptap 的 addKeyboardShortcuts 基础上提供了快捷键描述注册表。第三方扩展仍然只需实现一个 addKeyboardShortcuts,即可同时执行快捷键命令、在“键盘快捷键”侧边栏中展示操作说明,并在工具栏、Slash Command 或悬浮菜单中展示对应的快捷键提示。
6.1 注册快捷键并关联工具栏
使用 defineHaloKeyboardShortcuts 定义快捷键,再将相同的 id 传给工具栏组件的 shortcutId:
import {
  defineHaloKeyboardShortcuts,
  Extension,
  ToolbarItem,
  type Editor,
  type ExtensionOptions,
} from "@halo-dev/richtext-editor";
import { markRaw } from "vue";
import MyIcon from "./MyIcon.vue";

const shortcutId = "plugin.example.insertGreeting";

function insertGreeting(editor: Editor) {
  return editor.chain().focus().insertContent("Hello Halo").run();
}

export const ExtensionExample = Extension.create<ExtensionOptions>({
  name: "exampleShortcut",

  addKeyboardShortcuts() {
    return defineHaloKeyboardShortcuts(this, [
      {
        id: shortcutId,
        keys: ["Mod-Alt-g"],
        label: "插入问候语",
        category: "general",
        priority: 100,
        command: () => insertGreeting(this.editor),
      },
    ]);
  },

  addOptions() {
    return {
      ...this.parent?.(),
      getToolbarItems({ editor }: { editor: Editor }) {
        return {
          priority: 100,
          component: markRaw(ToolbarItem),
          props: {
            editor,
            isActive: false,
            icon: markRaw(MyIcon),
            title: "插入问候语",
            shortcutId,
            action: () => insertGreeting(editor),
          },
        };
      },
    };
  },
});
ToolbarItem、ToolbarSubItem、BubbleItem 和 Slash Command 菜单项都支持 shortcutId。ToolbarItem 还支持 shortcutIds,适用于一个按钮对应多个操作的情况。提示信息会展示每条定义中 keys 的第一组按键,快捷键侧边栏则会展示全部可选按键,并根据当前操作系统将 Mod、Alt 等按键格式化为对应的展示形式。
默认编辑器已经通过 ExtensionsKit 内置 ExtensionKeyboardShortcuts,插件通过 default:editor:extension:create 扩展点注册时无需重复添加。自行创建编辑器实例时,应使用 ExtensionsKit,或显式加入 ExtensionKeyboardShortcuts。
6.2 快捷键描述字段
defineHaloKeyboardShortcuts 接收的每一项都是一个 HaloKeyboardShortcutDefinition:
按键名称遵循 Tiptap 快捷键格式。建议使用 Mod 表示 macOS 的 Command 和 Windows/Linux 的 Control,例如 Mod-b。命令处理成功时应返回 true,这样 ProseMirror 会阻止浏览器继续执行同一按键的默认行为;未处理时应返回 false。
如果扩展继承的 Tiptap 扩展已经实现了相同按键,可以只补充 Halo 的描述信息,不需要重新实现命令:
addKeyboardShortcuts() {
  return defineHaloKeyboardShortcuts(this, [
    {
      id: "plugin.example.toggleFeature",
      keys: ["Mod-b"],
      label: "切换示例功能",
      category: "formatting",
    },
  ]);
},
只有父扩展确实定义了 keys 中对应的按键时才能省略 command。开发环境会对缺少实际命令的定义输出警告,并且不会注册这条描述。
6.3 自定义组件中的快捷键提示
完全自定义工具栏组件时,可以通过 useHaloKeyboardShortcut 响应式读取注册表,再使用 KeyboardShortcutTooltip 保持与内置工具栏一致的视觉和无障碍信息:
<script setup lang="ts">
import {
  KeyboardShortcutTooltip,
  useHaloKeyboardShortcut,
  type Editor,
} from "@halo-dev/richtext-editor";

const props = defineProps<{
  editor: Editor;
  shortcutId: string;
  title: string;
}>();

const shortcut = useHaloKeyboardShortcut(props.editor, () => props.shortcutId);
</script>

<template>
  <KeyboardShortcutTooltip
    v-slot="tooltipProps"
    :title="title"
    :shortcut="shortcut?.keys[0]"
  >
    <button :aria-label="tooltipProps.ariaLabel" type="button">
      {{ title }}
    </button>
  </KeyboardShortcutTooltip>
</template>
一个组件需要读取多条快捷键时,可以使用 useHaloKeyboardShortcuts(editor, () => shortcutIds)。这两个 composable 必须在 Vue 组件的 setup 阶段调用,以便组件卸载时自动取消注册表订阅。
6.4 命名与冲突规则
id 应包含插件标识,避免覆盖其他扩展注册的描述;快捷键注册表不会自动为重复 ID 添加命名空间。- 只注册产品中真实可执行的快捷键,不要为了填满快捷键侧边栏而自行创建按键组合。
- 添加按键前应检查 Halo 默认快捷键、Tiptap 默认快捷键以及浏览器常用快捷键。确实需要覆盖浏览器默认行为时,命令必须在成功处理后返回
true。
label 和 description 应面向用户描述操作,不要使用内部命令名或扩展名。
7. 编辑器扩展运行期元数据
从 Halo 2.26.0 开始,@halo-dev/richtext-editor 允许 Tiptap 的 Node、Mark 和 Extension 声明运行期组件元数据,用于描述最终 Editor 实例中的 schema、组件用法、结构关系、属性和示例。AI Agent 是目前的主要消费者,但这些元数据不会改变或约束组件的实际行为。
7.1 声明新组件
下面的数学公式节点说明了适用场景、属性和生成所需的外部能力:
import { Node } from "@halo-dev/richtext-editor";

export const MathBlock = Node.create({
  name: "mathBlock",
  group: "block",
  atom: true,

  addAttributes() {
    return {
      formula: {
        default: "",
      },
    };
  },

  parseHTML() {
    return [{ tag: 'div[data-type="math-block"]' }];
  },

  renderHTML({ HTMLAttributes }) {
    return ["div", { ...HTMLAttributes, "data-type": "math-block" }];
  },

  addHaloEditorMetadata() {
    return {
      ai: {
        description: "A display mathematical formula.",
        exposure: "available",
        useWhen: ["Presenting a standalone mathematical expression."],
        attributeGuidance: {
          formula: {
            description: "Formula source written in LaTeX.",
            format: "LaTeX",
            examples: ["E = mc^2"],
          },
        },
        generation: {
          mode: "requires-capability",
          requiredCapabilities: ["math-to-html"],
        },
        examples: ['<div data-type="math-block" formula="E = mc^2"></div>'],
      },
    };
  },
});
generation.mode 支持 direct-html、requires-capability 和 read-only。Capability 名称是开放字符串,Halo 只将其写入 Manifest,不负责查找或执行对应工具。
7.2 扩展现有组件
元数据会沿 Tiptap 的 .extend() 继承链自动合并。插件只需返回自己的局部补丁,不需要调用 this.parent,也不需要手动合并 Halo 已有说明:
import { ExtensionCodeBlock } from "@halo-dev/richtext-editor";

export const HighlightedCodeBlock = ExtensionCodeBlock.extend({
  addAttributes() {
    return {
      ...this.parent?.(),
      highlightTheme: {
        default: null,
      },
    };
  },

  addHaloEditorMetadata() {
    return {
      ai: {
        attributeGuidance: {
          highlightTheme: {
            description: "Syntax-highlighting theme.",
            allowedValues: ["github-light", "github-dark"],
            omitWhen: ["The editor default theme should be used."],
          },
        },
      },
    };
  },
});
最终 Manifest 会同时包含原代码块的说明和 highlightTheme 属性。
7.3 为全局属性贡献说明
普通 Extension 不会成为 Manifest 组件,但可以通过 contributions 向明确命名的 Node 或 Mark 贡献元数据。这适合与 addGlobalAttributes() 一起使用:
import { Extension } from "@halo-dev/richtext-editor";

export const Tone = Extension.create({
  name: "tone",

  addGlobalAttributes() {
    return [
      {
        types: ["paragraph", "heading"],
        attributes: {
          tone: {
            default: null,
          },
        },
      },
    ];
  },

  addHaloEditorMetadata() {
    return {
      contributions: [
        {
          targets: [
            { kind: "node", name: "paragraph" },
            { kind: "node", name: "heading" },
          ],
          metadata: {
            ai: {
              attributeGuidance: {
                tone: {
                  description: "Writing tone for this block.",
                  allowedValues: ["neutral", "friendly", "formal"],
                },
              },
            },
          },
        },
      ],
    };
  },
});
贡献只应用于最终 schema 中存在的目标。多个贡献冲突时,根据组件定义中的 priority 决定,较高者优先;priority 相同时,后注册者优先。
7.4 声明组件结构
组件只声明自己的父级和数量关系,不跨组件声明子节点:
addHaloEditorMetadata() {
  return {
    ai: {
      description: "An optional caption belonging to a figure.",
    },
    structure: {
      allowedParents: ["figure"],
      minPerParent: 0,
      maxPerParent: 1,
    },
  };
}
上例表示当前组件只能位于 figure 下,在每个 figure 中可以省略且最多出现一次。
7.5 读取运行期 Manifest
在 Editor 创建完成后,可以同步生成最终快照:
import {
  createHaloEditorManifest,
  type HaloEditorManifest,
  type VueEditor,
} from "@halo-dev/richtext-editor";

function editorManifest(editor: VueEditor): HaloEditorManifest {
  return createHaloEditorManifest(editor);
}
Manifest 是当前 Editor 实例的运行期快照,包含全部 Node 和 Mark、规范化元数据、version: 1 以及稳定的 signature。消费者可以用它了解当前编辑器实际注册的组件,并自行决定是否根据其中的建议进行额外校验。
元数据声明遵循以下兼容与安全规则:
ai: false 表示不建议 AI 主动使用该组件,但组件的 schema 信息仍会出现在 Manifest 中。- 声明抛错、字段无效、属性或父节点不存在时,生成器会保留其他有效数据。开发环境会输出警告,生产环境不会因元数据阻止编辑器运行。
- 未知字段会被丢弃。请勿将 system prompt、可执行回调或敏感信息放入元数据。
- 每段文本最多 1,000 个字符;说明数组和
aliases 最多 10 项;allowedValues 和属性示例最多 32 项;组件 HTML 示例最多 3 个且每个不超过 4 KiB;单组件 AI 元数据最多 16 KiB;单个 Manifest 的 AI 元数据最多 128 KiB。
实现案例